Authentication
RSA Authentication
Signing Requests
- Generate a 2048-bit private key
appRsaPrivateKeyfor signing requests. - Build the string
Content_To_Be_Signedthat will be signed. - Create the signature using the
SHA256WithRSAalgorithm. - Include the generated signature in the request body under the
signparameter.
For more information on each step, please refer to the following examples.
Steps to Calculate the Signature
1. Generate Key Pair
- The RSA algorithm is used for request signing. Each party generates an RSA key pair and exchanges public keys. When sending a request, the private key is used to sign the data, and the recipient verifies it with the corresponding public key. A private key must be generated using the method below, and the associated public key uploaded to CodePay.
In Java, the private key format must be PKCS8; in other languages, use PKCS1. The key length should be 2048 bits. Public keys are typically in PEM format, but some languages (such as C#) require DER format, which may require conversion.
If you’re not sure how to generate RSA2 keys, we recommend using the tool below. With it, you can quickly generate keys, create signatures, and verify them—all in just one click:
CodePay Key ToolYou can also manually generate RSA2 keys using openssl, as shown below:
# 1. Generating the private key
openssl genrsa -out client_private_key_php_dotnet.pem

# 2. If you are a Java developer, convert the private key to PKCS8 format, other development languages use the PKCS1 format
openssl pkcs8 -topk8 -inform PEM -in client_private_key_php_dotnet.pem -outform PEM -nocrypt -out client_private_key_pkcs8.pem

# 3. Generate the public key
openssl rsa -in client_private_key_php_dotnet.pem -pubout -out client_public_key_php_dotnet.pem

# 4. Generate the private key that can be used in Java
cat client_private_key_pkcs8.pem | grep -v "^\-" | tr -d "\n" | sed 's/%$//' > client_private_key_java.pem

# 5. Generate the public key that can be used in Java
cat client_public_key_php_dotnet.pem | grep -v "^\-" | tr -d "\n" | sed 's/%$//' > client_public_key_java.pem
2. Constructing the String to be Signed
Step 1: Get Your Parameters Ready for Signing
The parameters you need to sign include:
- API request parameters
- Response parameters
- Asynchronous notification parameters
👉 Make sure to exclude the sign parameter itself, as well as any parameters with NULL or empty string values.
When making a POST request, parameter values that contain special characters (such as & or @) must be URL-encoded so the server can process them correctly.
⚠️ Important: For signing, always use the original value, not the encoded one.
Example:
- Parameter to sign: test@msn.com ✅
- Not this: %40msn.com ❌
Here’s an example of the parameter array:
String [] parameters={
  "app_id=wzxxxxxxxxxx",
  "method=pay.orderquery",
  "format=JSON",
  "charset=UTF-8",
  "sign_type=RSA2",
  "version=1.0",
  "timestamp=1908901287917",
  "merchant_no=M100001876",
  "out_trade_no=TB20181030000875",
  "description="
  };
These are the parameters to include in the signature. Following the rules, any empty values (like description) should be excluded from the signature.
String [] parameters={
  "app_id=wzxxxxxxxxxx",
  "method=pay.orderquery",
  "format=JSON",
  "charset=UTF-8",
  "sign_type=RSA2",
  "version=1.0",
  "timestamp=1908901287917",
  "merchant_no=M100001876",
  "out_trade_no=TB20181030000875"
  };
Because JSON object keys are unordered, the signature rule only uses first-level keys and their values.
For nested JSON objects, make sure to convert their values to strings before generating the signature and sending the HTTP request.
{
    "key1":"value1",
    "key2":"value2",
    "key3":{
        "subkey31":"subvalue31",
        "subkey32":"subvalue32"
    }
}
{
    "key1":"value1",
    "key2":"value2",
    "key3":"{\"subkey31\":\"subvalue31\",\"subkey32\":\"subvalue32\"}"
}
Step 2: Sort Your Parameters
Sort the parameter names by their ASCII values in ascending order (a → z). If the first letters are the same, compare the second letters, and so on.
Here’s the array after the first sorting step:
String[] parameters={
    "app_id=wzxxxxxxxxxx",
    "charset=UTF-8",
    "format=JSON",
    "merchant_no=M100001876",
    "method=pay.orderquery",
    "out_trade_no=TB20181030000875",
    "sign_type=RSA2",
    "timestamp=1908901287917",
    "version=1.0"
  };
Step 3: Combine the Parameters
Join the sorted parameters using the & character, like in the example above:
app_id=wzxxxxxxxxxx&charset=UTF-8&format=JSON&merchant_no=M100001876&method=pay.orderquery&out_trade_no=TB20181030000875&sign_type=RSA2×tamp=1908901287917&version=1.0
3. Generate the Signature Using the Signature Function
Use the RSA2 signing function in your preferred programming language to sign the string you built in Step 2. The signature is calculated using the SHA256WithRSA algorithm.
sign=base64UrlEncode(sha256withrsa(<Content_To_Be_Signed>), <appRsaPrivateKey>);
The example below can help you verify that your signature was generated correctly:
1. My PKCS8 private key is:MIIEvQIBADANBgkqhkiG9w0BAQEFAASCBKcwggSjAgEAAoIBAQCJ9N8YTm0wEuBye5zSiZKncNIg6WBvTHjg4dYc9BH0zR+LeHd/jVo+InrMiIFgblnf7eYJ/wlPG5cSMMSyQMHj/7o0prc+VZsqi1mjX88InK4qDl6qFBFrg4dRrCAwILLVOP/ppUU3souMmnYnvOSUyuLBnhSno8qTpFSbcFAkPaHRmUmcTtVPWuNNbPaZVlNn81imIIVw8LKzOzCz9CNNcikkvbUlZp/cZ0Fl3s6icqOCjRvamg8KLZJs9D52S20X60ynreEIn8g6lr77byOGCCRwpdMl9Cl89WmbC3A3RKh7GRPtjyx3B5aQqE3sK5sNT8H8/EqcnQe8QoVBs7x1AgMBAAECggEAbE6vB+oqlt97DuY1TKVtWb+dePFAIKEtFYC4FKsZndOcvGaripxzCO0Q85sH16lLLh8bxyVPLag/hqx7AGcO0e1nRwbMPkf/NfuJOFZzuBMqOSJm96ghtQLiLiCwdJh3Ticd41U5bmziWlS6BqCp5JcUR2XQWXyiAh+1vQMEKC56CNPxr7imXITS7BYdY0qiGiOANcoEJhfQXn4BjzEm2FJufdlHW6/IeRYZ874HF3/7aUOyhbnapxYHU9PzicMc9XwerMcXMGvOfTUnCtRVONLn7jiknbpwdZ1d8PoItUZuaXdAyY6wFHZF+KvyrEoOV0eWRYzPgku2oSMD7IckUQKBgQDy+etogil+3F8S/qW1WiG6l2tLx5cwq3Ak9weN1zOo8A43obtXRxW2b4fDeol8y6LmYaIW9kKmK0qHEx5LoUSH7VN3FigNpFSa6muVJUuY+ob4H3Je+h3PaqbwhVFzjDofuIolPiJZW64LaFPZcxxD9vM2tZ6txLeMUmGftPoVSwKBgQCRWeNxbvTs8U5UknrdDZHUwXUmy5Qg2LUzxDXdbZXgolMh0AgDShcEFvaF+G3OFHj9vovytt0HtEXyC9LEc6w/a08mtGHiAJbjyjrJCHRNrcFflEm1xseIqXQXDj5Tw05XkAnlWN+r0w3Ix45+GrNhMOGfDkVyQeYI5Jsxxt0dPwKBgFJwcWr4HtQoOSnctKSffCovDfycL7QXtukT18BMb/611F0TxtiKCdfoZ4vvm454GUFJhxF7ZIm0zoid9/15LiNgZp1VKynVw878Epx8FvZEql6tbMTE4DBr41BgK46k2WPB3T1do5HmBVthfnGdGM4Gj+bUII6c3BoEKZNieCeZAoGAQ3rx5wXWW/KjpQvkUqAsJhQyqXI2MRGq/n+Hamen/4QdCEOmlLBfAx0OEqCFifljOpquKl7POvZsyrTGg0IYo9DUDGoOT3hqlRKcPBzasf2LGy6jEetZU48oQFPyh7zSsEBE999M6F6xtZdABjerM+IXvVpIz4TcoSBRFMj4es0CgYEAiNCbs2YPKBFpJq9EYsSsx0GwXAItXFAM71TogWs/8InGNq0PYRZTn9Lq6mFEyLkFql1zWQkS7CG3uDPBV+V2G4MbvoZeFgiQmly7uMQJwbEiKjJBsOzkYY2ZhFYLjGUpGer2U82XeEU6F/Vh4FLkVEE2iB3nPpVQs0qPZxfFZvM=

2. My PKCS1 private key is:MIIEowIBAAKCAQEAifTfGE5tMBLgcnuc0omSp3DSIOlgb0x44OHWHPQR9M0fi3h3f41aPiJ6zIiBYG5Z3+3mCf8JTxuXEjDEskDB4/+6NKa3PlWbKotZo1/PCJyuKg5eqhQRa4OHUawgMCCy1Tj/6aVFN7KLjJp2J7zklMriwZ4Up6PKk6RUm3BQJD2h0ZlJnE7VT1rjTWz2mVZTZ/NYpiCFcPCyszsws/QjTXIpJL21JWaf3GdBZd7OonKjgo0b2poPCi2SbPQ+dkttF+tMp63hCJ/IOpa++28jhggkcKXTJfQpfPVpmwtwN0SoexkT7Y8sdweWkKhN7CubDU/B/PxKnJ0HvEKFQbO8dQIDAQABAoIBAGxOrwfqKpbfew7mNUylbVm/nXjxQCChLRWAuBSrGZ3TnLxmq4qccwjtEPObB9epSy4fG8clTy2oP4asewBnDtHtZ0cGzD5H/zX7iThWc7gTKjkiZveoIbUC4i4gsHSYd04nHeNVOW5s4lpUugagqeSXFEdl0Fl8ogIftb0DBCguegjT8a+4plyE0uwWHWNKohojgDXKBCYX0F5+AY8xJthSbn3ZR1uvyHkWGfO+Bxd/+2lDsoW52qcWB1PT84nDHPV8HqzHFzBrzn01JwrUVTjS5+44pJ26cHWdXfD6CLVGbml3QMmOsBR2Rfir8qxKDldHlkWMz4JLtqEjA+yHJFECgYEA8vnraIIpftxfEv6ltVohupdrS8eXMKtwJPcHjdczqPAON6G7V0cVtm+Hw3qJfMui5mGiFvZCpitKhxMeS6FEh+1TdxYoDaRUmuprlSVLmPqG+B9yXvodz2qm8IVRc4w6H7iKJT4iWVuuC2hT2XMcQ/bzNrWercS3jFJhn7T6FUsCgYEAkVnjcW707PFOVJJ63Q2R1MF1JsuUINi1M8Q13W2V4KJTIdAIA0oXBBb2hfhtzhR4/b6L8rbdB7RF8gvSxHOsP2tPJrRh4gCW48o6yQh0Ta3BX5RJtcbHiKl0Fw4+U8NOV5AJ5Vjfq9MNyMeOfhqzYTDhnw5FckHmCOSbMcbdHT8CgYBScHFq+B7UKDkp3LSkn3wqLw38nC+0F7bpE9fATG/+tdRdE8bYignX6GeL75uOeBlBSYcRe2SJtM6Inff9eS4jYGadVSsp1cPO/BKcfBb2RKperWzExOAwa+NQYCuOpNljwd09XaOR5gVbYX5xnRjOBo/m1CCOnNwaBCmTYngnmQKBgEN68ecF1lvyo6UL5FKgLCYUMqlyNjERqv5/h2pnp/+EHQhDppSwXwMdDhKghYn5Yzqaripezzr2bMq0xoNCGKPQ1AxqDk94apUSnDwc2rH9ixsuoxHrWVOPKEBT8oe80rBARPffTOhesbWXQAY3qzPiF71aSM+E3KEgURTI+HrNAoGBAIjQm7NmDygRaSavRGLErMdBsFwCLVxQDO9U6IFrP/CJxjatD2EWU5/S6uphRMi5Bapdc1kJEuwht7gzwVfldhuDG76GXhYIkJpcu7jECcGxIioyQbDs5GGNmYRWC4xlKRnq9lPNl3hFOhf1YeBS5FRBNogd5z6VULNKj2cXxWbz

3. The string to be signed is:123456789

4. The result of calculating the signature using SHA256WithRSA is:F1kKldW4u0xdSzMqehHLtrX6ntK6gjlZ1Nu1IwcCYAvGe+K9/+9VZymbyNjw038ZcxGspnDqcz7+UnqqJ8gBPpMZ4yZb/NdS5TNqruuSooj2jgPk/PlM+uFH97NlMDuUdGVaflujhcaG9irkq48PHQ1+swaELq7mKov7NU155k7bRPWjNzIggxF5Sgh3qcOBpeWVxp/WghRsjfO4O0tRohiOK5pdcAPkj5VlunUgW0/Yv/uC9sV8dodLloUNWG6W0c/pEJnsG48pLLmhag5tzKm7nbHHUrRyLv37+qAuG9S5eZvKUaVbuFwxP2ekSLHRRIQVlBeJbuqfHRQXxzZaJw==

5. My public key is:MIIBIjANBgkqhkiG9w0BAQEFAAOCAQ8AMIIBCgKCAQEAifTfGE5tMBLgcnuc0omSp3DSIOlgb0x44OHWHPQR9M0fi3h3f41aPiJ6zIiBYG5Z3+3mCf8JTxuXEjDEskDB4/+6NKa3PlWbKotZo1/PCJyuKg5eqhQRa4OHUawgMCCy1Tj/6aVFN7KLjJp2J7zklMriwZ4Up6PKk6RUm3BQJD2h0ZlJnE7VT1rjTWz2mVZTZ/NYpiCFcPCyszsws/QjTXIpJL21JWaf3GdBZd7OonKjgo0b2poPCi2SbPQ+dkttF+tMp63hCJ/IOpa++28jhggkcKXTJfQpfPVpmwtwN0SoexkT7Y8sdweWkKhN7CubDU/B/PxKnJ0HvEKFQbO8dQIDAQAB

6. Signature Verification Result:true
4. Include the Generated Signature in the sign Parameter of Your HTTP Request
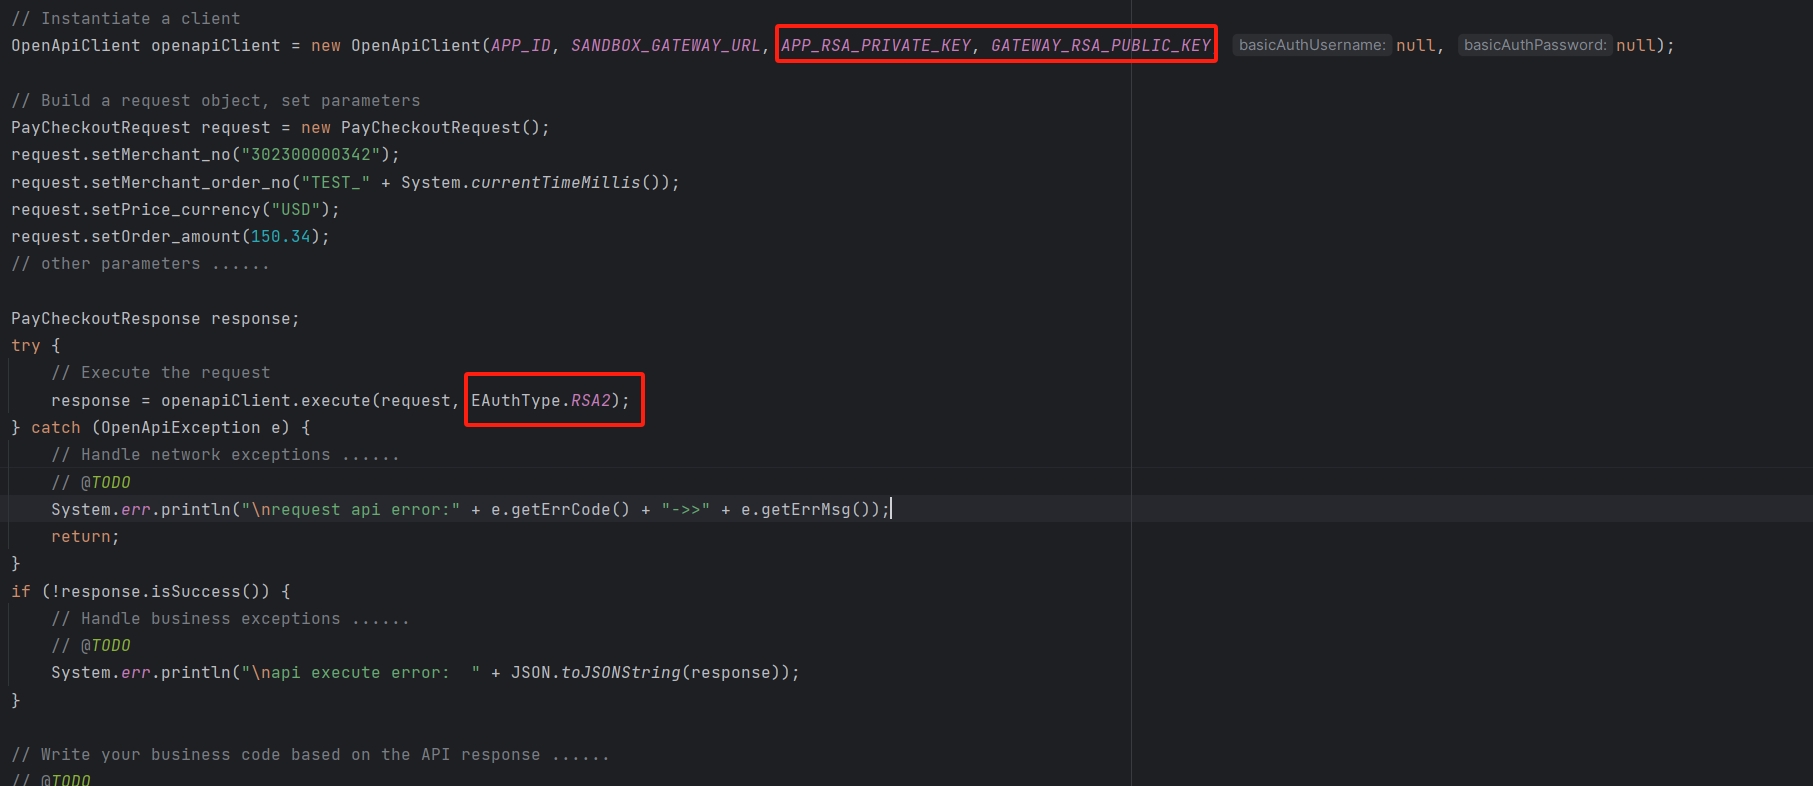
Example Code
Here’s an example using the Java SDK to demonstrate RSA signature verification. For the complete code, please refer to: Java SDK:
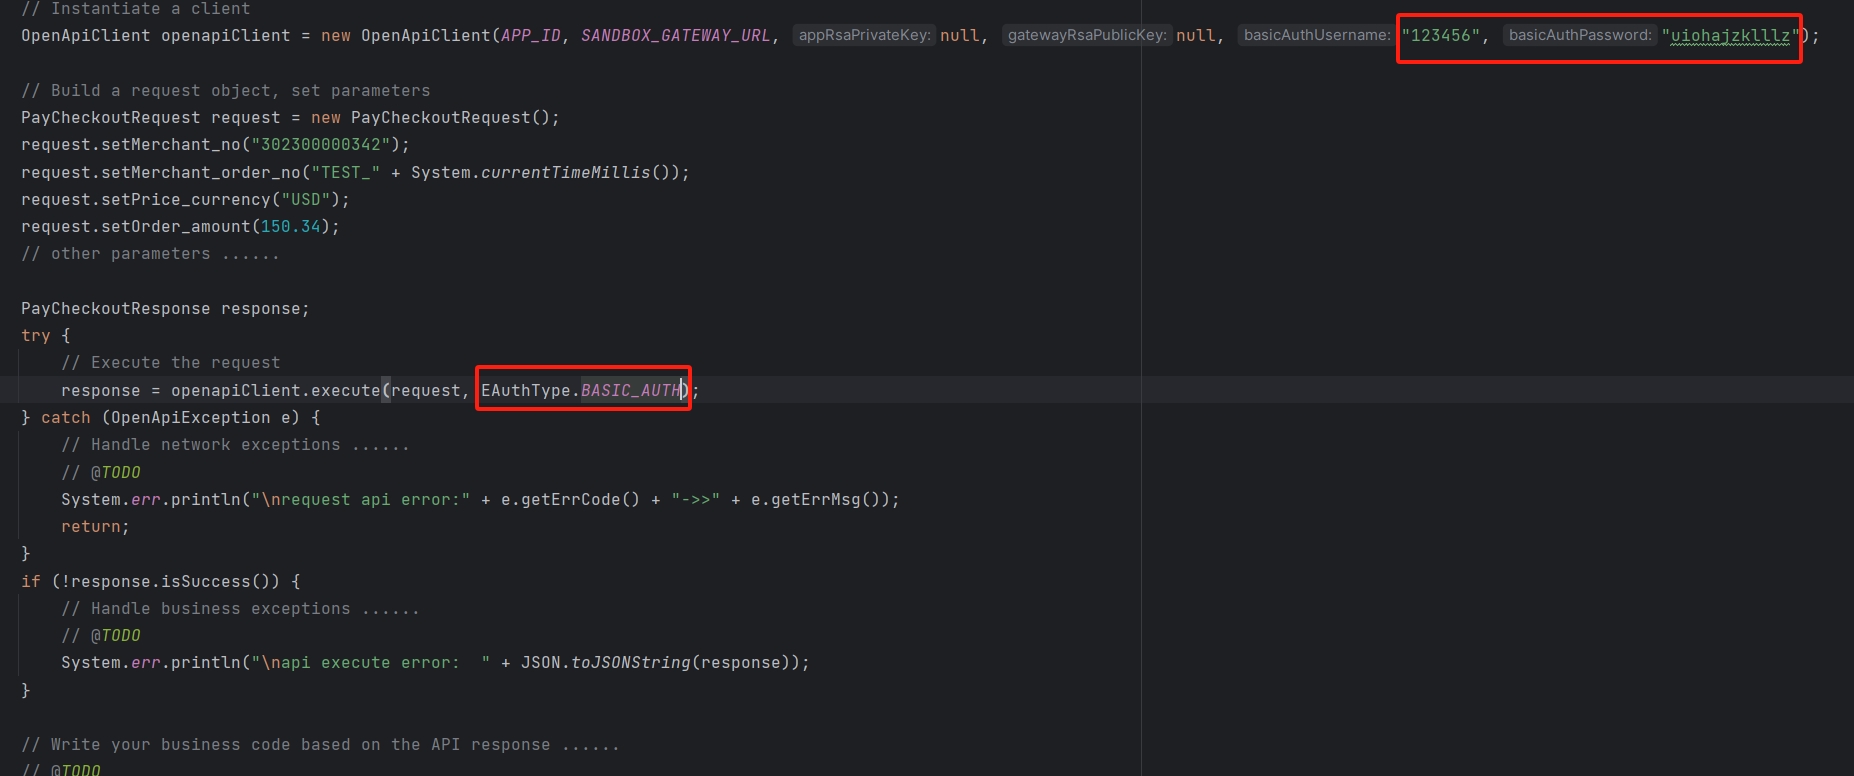
Basic Auth (Deprecated)
Basic Authentication is a simple authentication method commonly used in HTTP protocols. In this method, the client provides a username and password in the request header, and the server authenticates the client based on this information.
How It Works
- The client sends the username and password to the server via an HTTP request in a specific format:
Authorization: Basic <Base64 encoded username:password>
Where <Base64 encoded username:password> is the result of Base64 encoding the username and password separated by a colon. For example, if the username is "user" and the password is "password," their combination "user:password" will be Base64 encoded to dXNlcjpwYXNzd29yZA==, so the request header becomes:
Authorization: Basic dXNlcjpwYXNzd29yZA==
- After the server receives the request, it parses the Authorization header, decodes it to obtain the username and password. The server then checks if this information is valid. If the verification is successful, access to the requested resource is allowed; otherwise, an error is returned.
Example Code
The following is an example using the Java SDK, demonstrating how to use the HTTP request header for Basic Authentication. For the full code, please refer to Java SDK: